Sponsors


Organize a Large Shoot, Like a Wedding?
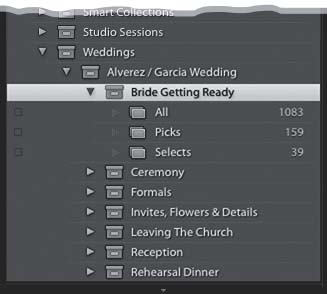
There is no “official” way to do this, but there are probably a dozen ways, so I’m going to share how I organize a big shoot like a wedding. The key here is using a collection set, which is basically one big main folder that all your individual collections go inside. For example, as soon as I’m back from the wedding, I would create a collection set and name it with the name of the wedding (for example, the Alverez/Garcia wedding). Then, I’d go ahead and create a bunch of collection sets inside of that main set right now (I’ll add the photos to them once I start sorting the images)—typical ones might be named: Rehearsal Dinner; Bride Getting Ready; Formals; Invites, Flowers & Details; Ceremony; Reception; Leaving The Church; and so on. Why are these collection sets? Because I’m going to need three collections inside of each. For example, inside the Bride Getting Ready collection set, you’d find three collections: (1) All (all the shots I took of the bride getting ready), (2) Picks (the shots inside this collection have a chance of making the final wedding album), and (3) Selects (these are the very best ones from the Picks collection, and are the ones that will be included in the wedding album or shared with the bride—these are the ones that get retouched, edited, and so on). Once those are in place, I import all the photos from the wedding, select big groups of images, and drag them into the appropriate collection sets. Then, I begin my process of going through the collections named “All,” marking the really good ones as Picks, then I turn on the Picks filter to see just those and drag them into my Picks collections. Now I start the narrowing down process again to find the “very best of the best.” Those go into my Selects collections.